
Operation & Maintenance Series — U03
How to Thread Twine on a Square Hay Baler: Step-by-Step Guide
A misthreaded twine path causes every bale to fail at the knotter. This guide covers the complete threading sequence for both twine positions — with the common errors that produce untied or half-tied bales.
Threading twine on a square baler is one of those tasks that experienced operators do without thinking — and that new operators get wrong in ways that aren’t immediately obvious. A threading error doesn’t produce an immediate dramatic failure. It produces a string of bales that either have no knot, a knot on one side only, or a knot that releases under pressure. By the time you notice the problem, you may have fifty untied bales scattered across the field.
This guide walks through the complete twine threading sequence for a standard two-twine small square baler — the type used in all 9YF series machines. The threading path has to be followed exactly, in the correct sequence, with the correct tension at each guide point. Read it through completely before starting, then work through it step by step at the machine.
Before You Start: Twine Selection and Spool Placement
Square balers use two separate twine spools — one for each knotter position (top and bottom, or left and right depending on machine orientation). Before threading, confirm:
- Twine type: Use the twine grade specified in your machine manual. Most 9YF series balers are set for twine in the 130–200 kg breaking strength range. Undersized twine breaks during compression; oversized twine creates excess bulk in the knotter and produces incomplete knots.
- Spool orientation: The twine must unwind from the spool in the correct direction. Both spools should unwind from the same side relative to the machine — check the label on the twine box for the intended unwind direction, and confirm the spool is loaded so twine feeds off the correct face.
- Spool holder condition: Confirm the spool holder allows the spool to rotate freely. A spool that binds creates uneven twine tension that disrupts knot formation even when the thread path is correct.
- Twine cleanliness: Wet, dirty, or grit-contaminated twine wears knife edges faster and jams twine guides. Store twine under cover and avoid dropping spools in soil or wet grass before installation.
The Twine Path: Understanding the Route Before Threading
Before threading, understand what the twine has to do during the bale cycle. From the spool, the twine travels through a series of guides and tensioners to the needle. When the bale reaches the set length, the needle swings through the bale chamber carrying the twine around the bale’s face. The knotter catches both the incoming twine from the needle and the standing twine from the previous cycle, forms a knot, and cuts the connection. Two complete cycles — one per knotter — secure each bale with two twines.
The threading path must position the twine so it arrives at the needle with correct tension at every point in the needle’s stroke. A single incorrect guide routing changes the geometry of the twine path and causes either tension problems or mispositioning at the knotter hook.
Step-by-Step Threading Sequence
Work through this sequence for both twine positions. The path description below follows the most common 9YF series layout — verify against your machine’s threading diagram (typically on a label on the twine box or knotter guard) if any guide location differs.
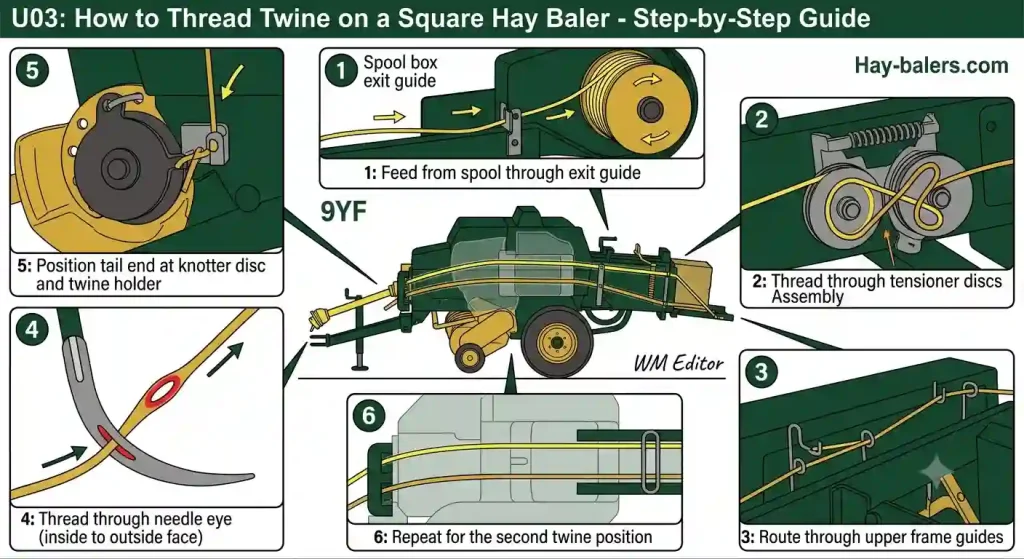
Feed twine from spool through the spool box exit guide
Pull approximately 1.5 metres of free twine from the spool. Feed it through the exit hole or guide at the edge of the spool box. This guide keeps the twine path from fouling on the spool frame as the spool rotates.
Thread through the tensioner assembly
The tensioner consists of two or more spring-loaded plates or discs that the twine passes between. Thread the twine through the correct gap — usually a figure-eight path through the tensioner plates. The tension spring must be engaged on both sides of the twine. Incorrect tensioner threading is the most common twine path error and produces loose or missing knots consistently.
Route through the upper twine guides along the machine frame
Multiple wire or cast guides run along the machine frame between the spool box and the needle. Thread the twine through each guide in sequence — do not skip any guide or route the twine outside a guide. Each guide maintains the twine in the plane of the needle swing; a twine that drops below or rises above this plane will not be picked up correctly by the knotter hook.
Thread through the needle eye
The needle has an eye near its tip, similar to a sewing needle but much larger. The twine passes through this eye from the inside face of the needle to the outside. Thread from the correct direction — the twine must emerge on the side that will present it to the knotter hook when the needle is at the top of its stroke. Threading in the reverse direction produces a geometrically incorrect knot path.
Position the free twine end at the knotter disc
After threading the needle, leave approximately 20–30 cm of free twine extending beyond the needle eye. This tail is held at the twine holder (twine finger) at the base of the knotter. Position the tail in the twine holder and confirm it is gripped securely. The twine holder maintains this tail in position until the first complete bale cycle secures it with a knot.
Repeat for the second twine position
The second twine position follows an identical path on the other side of the machine. Both twines must be threaded independently — a single twine threaded through both positions will not form two separate knots and will result in bales tied only at one point.
Verifying the Threading Before Running
After threading both positions, perform this verification before starting the machine:
- Pull the free end of each twine strand gently — you should feel consistent tension from the tensioner. If one side is slack when the other is firm, check the tensioner threading on the loose side.
- Manually push the needle through its full arc (with the machine unpowered). Observe whether the twine follows the needle smoothly or catches on any guide. If it catches, identify which guide and re-route.
- Confirm both twine tails are seated in their twine holders and gripped — not just resting against them.
Joining a New Spool Mid-Field
When a spool runs out mid-operation, you need to join the new spool’s twine to the old spool’s remaining tail without re-threading the full path. The correct method is a square knot tied 30–40 cm back from the needle eye — far enough that the knot passes through all guides before reaching the knotter without jamming.
Do not use a large knot or a bulky splice — a knot that is too wide to pass through a guide will jam the twine path at that point, causing a complete stoppage. The square knot, properly tied on matching twine of the same diameter, passes through standard guides without issue.
For twine specifications, recommended breaking strengths, and full product support, contact us at [email protected]. If you are looking for equipment that integrates reliably with your tractor’s PTO shaft drive system, our team can advise on driveline compatibility before purchase.
Canada Hay-Balers Co., Ltd
10055 Hogarth Dr, Richmond, BC V7E 3Z9 | [email protected]
Editor:WM